Instruments#
Summary
In this tutorial, we’ll see how to create a (very) basic synthesizer from stratch using oscillators and envelopes. We’ll also give an overview of the instruments built in ipytone (copied from Tone.js).
Note: you can download this tutorial as a
Jupyter notebook.
import ipytone
import matplotlib.pyplot as plt
Building a synth from scratch#
The most basic elements of a synthesizer are oscillators and envelopes. Let’s build a very simple synth using one oscillator and one amplitude envelope.
Oscillator#
Ipytone provides different oscillators (see Section Source of API reference) that can generate sound from basic waveforms modulated at a given frequency.
Let’s here use an Oscillator that we connect to the
destination (speakers) so we can hear it.
osc = ipytone.Oscillator().to_destination()
By default, the type (shape) of the waveform is a sine. Ipytone Oscillators
generally support other waveform types such as sawtooth, triangle, square,
etc.
osc.type
'sine'
The frequency of the oscillator gives the note. It is possible to set it with a number (Hertz) or a string (note + octave), e.g.,
osc.frequency.value = "C4"
With the start() and stop() methods, this already gives a very basic synth
that can trigger notes (beware of the volume of your speakers):
osc.start().stop("+0.5")
Oscillator()
That’s not very fancy, though. The audio signal changes abruptly when starting / stopping the oscillator, causing unpleasant “clicks”.
Envelope#
An envelope allows to smoothly modulate a signal over time with a curve that is generally characterized by 4 segments: attack, decay, sustain and release.
Ipytone provides the such an Envelope as well as subclasses
for the two most common envelopes:
AmplitudeEnvelopeto modulate the gain of a signalFrequencyEnvelopeto modulate the frequency of a signal
To prevent clicks when starting / stopping the oscillator, let’s connect it to
an AmplitudeEnvelope:
# first disconnect the oscillator from the destination
osc.disconnect(ipytone.destination)

env = ipytone.AmplitudeEnvelope(sync_array=True)
osc.chain(env, ipytone.destination)
Oscillator()
It is possible to get or set the overall shape of the envelope using its
attack, decay, sustain and release attributes, each synchronized with
the front-end (more attribute allows to set the shape of the curve - linear,
exponential, etc. - of each segment):
[env.attack, env.decay, env.sustain, env.release]
[0.01, 0.1, 1.0, 0.5]
Because we’ve set sync_array=True above when creating the envelope, we can get
the whole envelope curve data in Python via its array attribute. It is useful
for visualizing the envelope:
plt.plot(env.array);

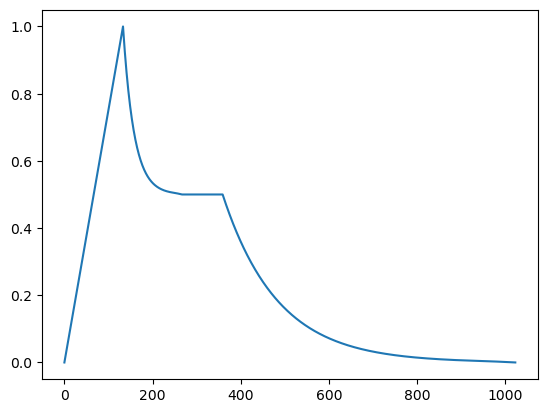
Let’s change the envelope shape a bit and see the result:
env.attack = 0.1
env.sustain = 0.5
plt.plot(env.array);
Now that the oscillator is connected to the envelope, we shouldn’t hear any sound when starting the oscillator:
# no sound!
osc.start()
Oscillator()
We need to explicitly trigger the attack part of the envelope with
trigger_attack():
env.trigger_attack()
AmplitudeEnvelope(attack=0.1, decay=0.1, sustain=0.5, release=0.5)
The oscillator signal will then modulate over the attack and decay part of the envelope until it reaches the sustain level.
To trigger the release part of the envelope, we need to call
trigger_release():
env.trigger_release()
AmplitudeEnvelope(attack=0.1, decay=0.1, sustain=0.5, release=0.5)
Sometimes we want to trigger the release some specific time after having the
triggered the attack. This can be done with the
trigger_attack_release() method:
# trigger attack and trigger release after 1/2 second
env.trigger_attack_release(0.5)
AmplitudeEnvelope(attack=0.1, decay=0.1, sustain=0.5, release=0.5)
We won’t need the oscillator and the envelope below. Before moving on, let’s dispose them
osc.dispose()
env.dispose()
AmplitudeEnvelope(disposed=True, attack=0.1, decay=0.1, sustain=0.5, release=0.5)
Built-in instruments#
Ipytone provides a few built-in instruments (see Section Instrument of API reference) that perform basic or more advanced sound synthesis from a combination of connected nodes (oscillators, envelopes, etc.). Ipytone also provides a Sampler.
Let’s use the Synth here:
synth = ipytone.Synth()
Instruments behave like audio nodes, i.e., we can connect them to other nodes:
# connect synth to the speakers
synth.connect(ipytone.destination)
Synth()
All instruments can be played via a common interface including
trigger_attack(),
trigger_release() and
trigger_attack_release() methods, e.g,
# trigger a "C4" note for 1/2 second
synth.trigger_attack_release("C4", 0.5)
Synth()
Each instrument may expose its own components. The Synth used
here combines an oscillator and an amplitude envelope just like we did above.
synth.oscillator
OmniOscillator()
synth.envelope
AmplitudeEnvelope(attack=0.005, decay=0.1, sustain=0.3, release=1.0)
# finished now with synth
synth.dispose()
Synth(disposed=True)
Monophonic synths#
Monophonic synthesizers can only play one note at a time. They
all have a portamento attribute, which allows smoothly sliding the frequency
between two triggered notes.
Let’s create a MonoSynth:
msynth = ipytone.MonoSynth().to_destination()
# without portamento
msynth.trigger_attack_release("C3", 0.5)
msynth.trigger_attack_release("C5", 0.5, time="+0.25")
MonoSynth()
msynth.portamento = 0.3
# with portamento
msynth.trigger_attack_release("C3", 0.5)
msynth.trigger_attack_release("C5", 0.5, time="+0.25")
MonoSynth()
msynth.dispose()
MonoSynth(disposed=True)
Polyphonic synths#
PolySynth allows turning any monophonic synthesizer into a
polyphonic synthesizer, i.e., an instrument that can play multiple notes at the
same time.
Let’s create a polyphonic synth from a Synth:
psynth = ipytone.PolySynth(voice=ipytone.Synth, volume=-8).to_destination()
A list of notes can be passed to the trigger methods to play a chord:
psynth.trigger_attack_release(["C3", "C4", "E4", "G4"], 0.5)
psynth.trigger_attack_release(["G2", "G4", "B4", "D4"], 0.5, time="+0.5")
psynth.trigger_attack_release(["C3", "C5", "E5", "G5"], 0.5, time="+1")
PolySynth()
We can also pass a list of duration times to play the chord with some “expression”:
psynth.trigger_attack_release(["C3", "C4", "E4", "G4"], [0.5, 0.7, 0.9, 1])
PolySynth()
It is possible to change the parameters of the polyphonic synth via its voice
property, which returns a single instance of the mono synth. This instance is
deactivated (it doesn’t make any sound), but changing the value of an attribute
of one of its components will apply to all voices of the polyphonic synth.
psynth.voice.envelope.attack = 0.4
# play each chord with a slow attack
psynth.trigger_attack_release(["C3", "C4", "E4", "G4"], 0.5)
psynth.trigger_attack_release(["G2", "G4", "B4", "D4"], 0.5, time="+0.5")
psynth.trigger_attack_release(["C3", "C5", "E5", "G5"], 0.5, time="+1")
PolySynth()
Note
Changing the settings of some components of the PolySynth.voice may have
no effect. This generally works with common components like the oscillator
and the amplitude envelope.
In addition to trigger_attack(), trigger_release() and
trigger_attack_release(), PolySynth provides a
release_all() method that will trigger release for all the active voices
psynth.trigger_attack(["C3", "C4", "E4", "G4"])
psynth.trigger_attack(["G2", "G4", "B4", "D4"], time="+0.5")
psynth.trigger_attack(["C3", "C5", "E5", "G5"], time="+1")
PolySynth()
# release all chords triggered above
psynth.release_all()
PolySynth()
The maximum number of active voices is controlled by max_polyphony. When
this number is reached, additional notes won’t be played.
psynth.max_polyphony = 3
# this will play only 3 notes!
psynth.trigger_attack_release(["C3", "C4", "E4", "G4"], 0.5)
PolySynth()
End of this tutorial!
psynth.dispose()
PolySynth(disposed=True)